Your First Steps to Data Domination Setting Up Google Analytics
- Mar 18
- 12 min read
Introduction: Why Google Analytics is Your Website's Best Friend

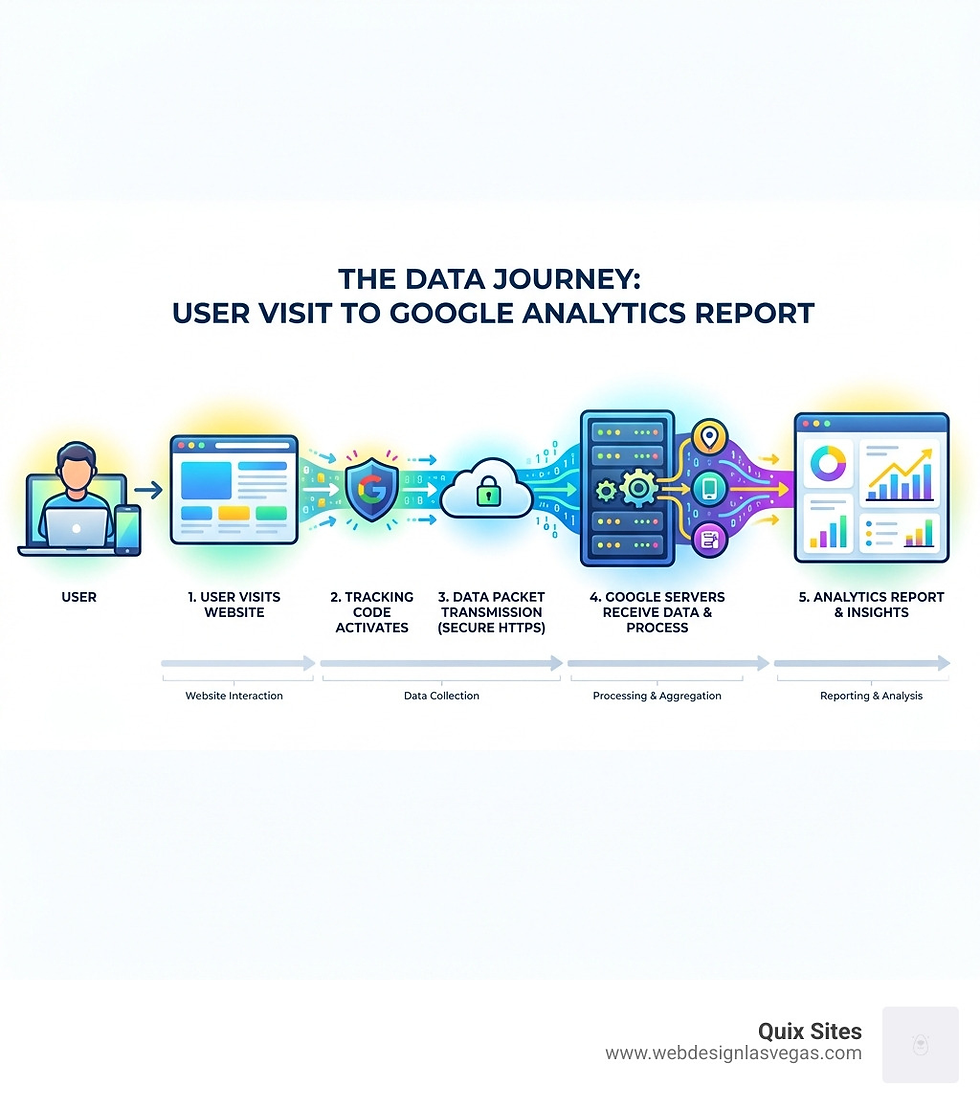
Setting up Google Analytics setup might seem tricky, but it's crucial for understanding your website's performance. Here are the core steps to get started:
Create an Analytics Account: Sign up at analytics.google.com with your Google account.
Create a GA4 Property: Set up a new property for your website within your account.
Add a Web Data Stream: Link your website to the property to define what data to collect.
Install the Google Tag: Place the tracking code on your website using your CMS or manually.
Verify Data Collection: Check the Realtime report to ensure data is flowing.
Are you wondering where your website traffic comes from? Do you want to understand what people do when they visit your site? If your goal is to make smarter decisions about your online presence, then Google Analytics is your secret weapon.
Google Analytics is a free tool that collects data from your website. It helps you see how users interact with your content. This means you can stop guessing and start making data-driven choices.
The latest version, Google Analytics 4 (GA4), is now the standard. It focuses on events and user journeys across different devices. If you've heard of Universal Analytics (UA), know that GA4 has replaced it. UA is an older, legacy system.
Before you dive in, you'll need a Google Account. You also need access to your website's backend or content management system (CMS). These are the basic requirements to begin your setup journey.
I'm Athena Kavis, your guide through web design and digital strategy. With over 8 years of experience, I've designed countless high-converting websites and gained deep expertise in essential tools like Google Analytics setup, ensuring businesses thrive online.
The Core Google Analytics Setup Process
Starting on your Google Analytics setup journey is like laying the foundation for a skyscraper – it needs to be solid to support everything that comes after. We'll guide you through each essential step, ensuring your data collection is robust and ready to deliver insights.

Step 1: Create a Google Analytics Account
The very first step in your Google Analytics setup is creating an account. Think of this as your central hub for all your analytics data. If you already have a Google account (like for Gmail or Google Drive), you're halfway there!
Go to analytics.google.com: Open your web browser and head over to analytics.google.com.
Sign in or Start Measuring: If this is your first time, you'll likely see a "Start Measuring" button. Click it. If you already have an account, you might need to steer to the "Admin" section and click "Create," then select "Account."
Account Name: Choose a descriptive name for your account. This is usually your business name. For instance, if you run Quix Sites, you might name your account "Quix Sites Analytics." If you manage analytics for multiple businesses, it's best practice to create a separate Analytics account for each one.
Data-sharing settings: Review the data-sharing options. These settings control what data Google can use for benchmarking, technical support, and account specialists. We recommend you read these carefully and choose what aligns with your privacy preferences.
Proceed: Click "Next" to continue.
You can add up to 2,000 properties (which can be a mix of Universal Analytics and Google Analytics 4 properties) to a single Analytics account. So, your account can grow with your business!
Step 2: Create a Google Analytics 4 Property
Once your account is set up, the next logical step is to create a "property." A property is where the data from your website or app is collected and organized. Since GA4 is the current standard, we'll focus on setting up a GA4 property.
Property Name: Give your property a clear and recognizable name, usually your website's name (e.g., "Quix Sites Website").
Reporting time zone and Currency: Select the reporting time zone that matches your business's primary location, such as Las Vegas, Nevada. This is crucial because it affects how your daily reports are recorded. For example, if a visitor accesses your site on a Tuesday in their time zone but it's Monday in your selected reporting time zone, the visit will be recorded as occurring on Monday. Google Analytics automatically adjusts for Daylight Savings Time if your chosen time zone honors it. Also, select your local currency (e.g., USD).
Business Information: Google Analytics will ask you for details about your business. This includes your industry category (e.g., "Arts & Entertainment," "Business & Industrial") and your business size (e.g., "Small," "Medium," "Large").
Business Objectives: You'll also be asked how you intend to use Google Analytics. This helps GA4 tailor the set of default reports it provides to you, making it easier to find relevant insights. For instance, if you select "Generate more leads," you'll see reports geared towards that goal. We recommend starting with "Get baseline reports" if you're unsure, and you can always adjust this later.
Create: Click "Create" and accept the Analytics Terms of Service.
Step 3: Set Up a Web Data Stream
With your account and property ready, it's time to tell Google Analytics where to collect data from. This is done by setting up a "data stream." For websites, this will be a "web data stream."
Steer to Data Streams: In the "Admin" section of your GA4 property, under "Data collection and modification," click "Data Streams."
Add Stream: Click "Add stream," then choose "Web."
Website URL and Stream Name: Enter your website's URL (e.g., https://www.webdesignlasvegas.com). Make sure to select the correct protocol (http or https). Give your stream a name (e.g., "Quix Sites Web").
Improved Measurement: By default, GA4's "Improved measurement" is enabled. This is a fantastic feature that automatically collects important events like page views, scrolls, outbound clicks, site search, video engagement, and file downloads, without requiring additional code. We highly recommend keeping this enabled, as you can always disable individual events later if needed.
Create Stream: Click "Create stream."
Finding your Measurement ID
After creating your web data stream, you'll be presented with the "Web stream details" page. This page is very important because it contains your unique Google tag ID, also known as your Measurement ID.
The "G-" Prefix: Your Measurement ID will start with "G-" followed by a series of numbers and letters (e.g., G-XXXXXXXXXX). This is your Google tag ID.
Copy it: Copy this ID. You'll need it for the next step: connecting GA4 to your website.
Connecting GA4 to Your Website: The Final Step
Now that you have your Google tag ID, it’s time to install it on your website. This is the crucial step that tells Google Analytics to start listening and collecting data from your visitors. There are a couple of main ways to do this, depending on how your website is built.
Method | Ease of Use | Flexibility | Best Use Cases |
CMS Integration | Very High | Low (pre-defined) | Wix, Shopify, platforms with built-in Analytics fields |
Manual Installation | Medium (requires code access) | High (full control) | Custom-built sites, advanced tracking needs |
Installing with a Website Builder (Wix & Shopify)
If your website is built on a popular platform like Wix or Shopify, installing the Google tag is usually straightforward. These platforms often have dedicated fields or sections where you can simply paste your Measurement ID.
Wix integration
For our clients in Las Vegas who use Wix for their stunning websites, connecting Google Analytics is a breeze:
Log in to Wix: Access your Wix dashboard.
Steer to Integrations: Go to "Marketing & SEO" in the left-hand menu, then select "Marketing Integrations."
Find Google Analytics: Look for the Google Analytics integration and click "Connect."
Paste Measurement ID: You'll be prompted to enter your Google Analytics ID. Paste your "G-XXXXXXXXXX" Measurement ID here.
Save: Follow any on-screen instructions to save your changes.
Wix handles the code placement for you, ensuring your Google tag is correctly installed across your entire site.
Shopify integration
For our e-commerce partners using Shopify, the process is equally simple:
Log in to Shopify: Access your Shopify admin panel.
Go to Preferences: In the left-hand menu, click "Online Store," then select "Preferences."
Find Google Analytics: Scroll down to the "Google Analytics" section.
Paste Measurement ID: You'll see a field to paste your Google Analytics ID (your "G-XXXXXXXXXX" ID).
Save: Click "Save."
Shopify will then integrate the Google tag into your store, enabling data collection.
Manual Google Analytics Setup: Adding the Code Yourself
If you have a custom-built website or prefer to have direct control over your code, you can manually install the Google tag. This involves pasting a snippet of JavaScript directly into your website's HTML.
gtag.js snippet
The Google tag uses a JavaScript library called gtag.js. This is a single piece of code that you'll add to your website.
Find the code:
Sign in to your Google Analytics account.
Go to "Admin."
Under "Data collection and modification," click "Data Streams."
Select your web data stream.
Under "Google tag," click "Configure tag settings."
Under "Your Google tag," click the Google tag.
Steer to the "Installation instructions" tab.
Choose "Install manually" to reveal the gtag.js snippet.
Copy the entire code snippet.
For more detailed information, you can always refer to Google's official documentation: Set up the Google tag with gtag.js.
Pasting the code
Once you've copied the gtag.js snippet, you need to paste it into the HTML code of every page on your website that you want to track.
The <head> section: The best place to paste this code is immediately after the opening <head> tag (the very first <head> tag) on each page. This ensures the tag loads early when a user visits your page.
Consistency is key: Ensure the exact same code snippet is on every page you wish to measure. This allows Google Analytics to track user journeys accurately across your entire site.
How to Test Your Google Analytics Setup
After all that hard work, you'll want to confirm that your Google Analytics setup is actually working and collecting data. This is a critical step!
Wait a few minutes: Data collection may take up to 30 minutes to begin flowing into your reports. So, grab a coffee or take a quick break.
Use the Realtime report:
Go to your Google Analytics account.
In the left-hand navigation, click "Realtime."
Now, open your website in a new tab or ask a friend to visit it.
Watch the Realtime report in Google Analytics. You should see active users appearing on the map and in the user count. If you see yourself (or your friend) as an active user, congratulations! Your Google tag is working.
While the Realtime report confirms immediate data flow, it can take up to 24 hours for Google Analytics to fully detect your tracking code and up to 48 hours for complete data to populate all your standard reports. So, don't panic if other reports look empty right away. Patience is a virtue in analytics!
Beyond the Basics: Opening up Advanced Insights in GA4
Once your basic Google Analytics setup is complete and data is flowing, you've open uped the door to a world of deeper insights. GA4 offers powerful features to refine your data collection and integrate with other marketing tools, helping you truly understand your audience and optimize your online presence here in Las Vegas.
Setup Assistant
Google Analytics 4 includes a handy "Setup Assistant" designed to guide you through essential configurations. It's like having a checklist of all the important things to do after your initial setup.
Guided Configuration: The Setup Assistant provides a structured workflow for configuring your GA4 property, ensuring you don't miss crucial steps. It covers everything from setting up data collection to linking other Google products.
Accessing it: You can access the Setup Assistant from your GA4 property's "Admin" section.
Permissions: To make changes using the Setup Assistant, you'll need at least an "Editor" role on the property.
To dive deeper into leveraging this tool, check out Google's guide: [GA4] Configure your GA4 property using Setup Assistant.
Linking to Google Ads
For businesses in Las Vegas running advertising campaigns, linking your GA4 property to Google Ads is a game-changer. This integration allows your analytics data and advertising efforts to work in harmony.
Import Conversions: You can import key events from GA4 into Google Ads as conversions. This means you can track specific actions (like a purchase or a contact form submission) that happen on your website directly within your ad campaigns.
Remarketing Audiences: GA4 allows you to create highly segmented audiences based on user behavior (e.g., visitors who viewed a specific product but didn't purchase). You can then make these audiences available in Google Ads to target them with custom ads.
Bid on GA4 Conversions: By linking, you can optimize your Google Ads bidding strategies based on the valuable conversion data flowing from your GA4 property, leading to more efficient ad spending.
Configuring Key Events
In GA4, "key events" are paramount. These are the most important user actions on your website that contribute directly to your business goals. Think of them as milestones on your customer's journey.
Mark Important User Actions: Key events could be anything from a successful purchase on your Shopify store to a lead submitting a contact form on your Wix site, or even a user signing up for your newsletter.
How to Set Them Up:
In the "Admin" section of your GA4 property, under "Data display," click "Key events" (or "Events" and then toggle the "Mark as key event" switch for an existing event).
You can mark any existing event (including those collected automatically by Improved Measurement) as a key event.
You can also create new custom events and then mark them as key events.
Why they matter: Marking events as key events allows GA4 to prioritize them in reports and makes them available for use in Google Ads for conversion tracking.
Learn more about measuring user activity with recommended events by watching this helpful video: Measure user activity with recommended events in Google Analytics.
Managing Users
As your team grows, you'll likely want to give different people access to your Google Analytics data. GA4 allows you to manage users and their permissions effectively.
Add/Remove Users: You can easily add new users to your Analytics account or property and remove them when necessary.
User Permissions: Google Analytics has various predefined roles:
Administrator: Has full control, including managing users and linking accounts.
Editor: Can create, edit, and delete properties and views.
Marketer: Can edit and collaborate on shared assets, including marking key events.
Analyst: Can edit and collaborate on shared assets.
Viewer: Can see reports and configuration data.
Assigning the right role ensures that everyone has the access they need without compromising data integrity or security.
Advanced Tracking
For those looking to push the boundaries of data collection, GA4 offers several advanced tracking capabilities.
User-ID Tracking: This feature allows you to associate your own unique identifiers with individual users. By implementing User-ID, you can get a more accurate, unified view of a user's journey across different sessions, devices, and platforms (e.g., tracking a logged-in user who switches from their phone to a desktop). This provides a more holistic understanding of user behavior.
Measurement Protocol: The Google Analytics Measurement Protocol allows developers to send events directly to Google Analytics servers via HTTP requests. This is incredibly useful for measuring interactions that happen server-to-server or offline, like point-of-sale transactions or data from CRM systems, extending your data collection beyond standard website or app interactions.
BigQuery Integration: For businesses with large datasets and complex analytical needs, linking GA4 to Google BigQuery is a powerful option. BigQuery is Google Cloud's fully managed, serverless data warehouse. This integration allows you to export your raw GA4 event data directly to BigQuery, where you can run sophisticated queries, combine it with other data sources, and perform advanced analysis that isn't possible within the standard GA4 interface.
Frequently Asked Questions about Google Analytics
We often get asked common questions about Google Analytics setup and usage. Here are some of the most frequent ones we hear from businesses right here in Las Vegas.
Is it free to set up Google Analytics?
Yes, absolutely! Setting up and using the standard version of Google Analytics (GA4) is completely free. There are no charges for utilizing its powerful features to track your website's performance and user behavior.
How long does it take for data to appear after setup?
After you've correctly installed your Google tag, data collection may take up to 30 minutes to begin. You can verify this almost immediately using the "Realtime" report in Google Analytics. However, for full reports to populate completely with comprehensive data, it might take Google between 24 to 48 hours. So, a little patience goes a long way!
What's the difference between an Account, a Property, and a Data Stream?
These terms describe the hierarchical structure within Google Analytics:
Account: This is the highest level of organization. Typically, a single Google Analytics Account corresponds to an entire business or organization. You might have one account for "Quix Sites" and manage all your websites and apps under it.
Property: A Property lives within an Account and usually represents a specific website or mobile application. For instance, if Quix Sites has a main website and a separate e-commerce store, each would be its own property within the Quix Sites account.
Data Stream: A Data Stream is the specific source of data within a Property. For a GA4 property, you'll create different data streams for your website (web data stream), iOS app, or Android app. This is where your Measurement ID (G-XXXXXXXXXX) comes from.
Your Account holds your Properties, and your Properties receive data from one or more Data Streams.
Conclusion: From Setup to Strategy
Congratulations! You've steerd the essential steps of Google Analytics setup, from creating your account and property to installing the Google tag on your website and verifying data collection. This is a monumental first step on your journey to data domination.
Data is power. With Google Analytics, you're no longer guessing about your website's performance. You're equipped with insights into who your audience is, how they found you, and what they do on your site.
Your next steps involve exploring the reports, understanding what your data is telling you, and using that knowledge to optimize your site. Whether it's refining your content, improving user experience, or boosting your marketing campaigns, Google Analytics provides the roadmap.
At Quix Sites, we believe a high-performance, visually stunning website is the foundation for meaningful data. If you want a site that not only looks great but is also primed for analytics, our team in Las Vegas can help. We specialize in custom website design on platforms like Wix and Shopify, ensuring your online presence is both beautiful and data-ready. Get a quote for a custom website design today and let's build something amazing together!